Learn
Design your own product labels
A good product label has to do two jobs at once: look right, and print right. This guide covers both. You'll set up a proper print document, add your artwork by hand or by feeding the AI a spec sheet, add a die-cut line so it can be cut to shape, and export a print-ready PDF your print service will accept without a single email back and forth.
It works the same for stickers, jar labels, bottle labels and pouches — only the size and cut shape change.
What a print-ready label needs
Before any pixels, three measurements decide whether a file prints cleanly:
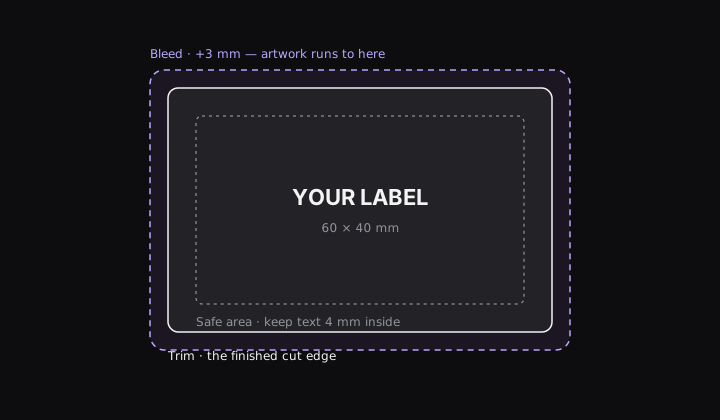
| Term | What it is | Rule of thumb |
|---|---|---|
| Trim | The finished size, where it's cut | Your actual label size, e.g. 60 × 40 mm |
| Bleed | Artwork that runs past the trim | Extend backgrounds 3 mm beyond every edge |
| Safe area | Where important content lives | Keep text ~4 mm inside the trim |
Get these right and the cut never slices a letter or leaves a white sliver. Everything below is in service of them.
Set up the document
- File → New, and enter your trim size (say 60 × 40 mm). Set Units to millimeters under View → Units.
- Switch View → Color mode to CMYK (print) — labels are printed with ink, and CMYK soft-proofs your colors on screen and warns you about ink that's too heavy.
- Open File → Document setup… and add a 3 mm bleed. Turn on View → Show bleed so the red bleed guide is visible; run any background all the way to it.
Working in CMYK from the start means no surprise color shifts later — what you see is close to what the press produces.
Add your artwork
Pick whichever path fits how you like to work. You can also start with the Assistant and finish by hand.
Option A — by hand
- Press
Tand type your product name; style it in the Properties panel (font, size, weight, tracking). Keep text inside the safe area. - Add a logo or image with the quick-add image button. Use the image fit controls to Fill or Fit the frame. In a CMYK document the editor flags any image whose effective resolution drops below 300 PPI with a warning on the image — keep images above that at final size so they print sharp.
- Add shapes for backgrounds and accents. Give your brand colors real names in Swatches so they stay consistent.
Option B — hand the Assistant a print spec
This is often the fastest way to a first draft. Open the Assistant and paste a short spec — dimensions, what goes on the label, and the look you want. For example:
Design a 60 × 40 mm product label, CMYK, 3 mm bleed.
Product: "Wildflower Honey", net weight 250 g.
Include: brand name, "Raw & Unfiltered" tagline, net weight, and a small space
for a barcode bottom-right.
Style: warm, natural, cream background, dark green serif wordmark.
The Assistant lays it out on the canvas — text, shapes, colors — and you refine from there. Because you gave it the size, color mode and bleed, the document is already print-shaped. If you keep a brand kit pinned, it will use your real colors and fonts automatically.
Add a die-cut line
If your label is cut to a shape (a rounded rectangle, a circle, or a custom silhouette), the printer needs a cut line on its own spot color so their machine knows where to cut.
- Select the object whose outline defines the shape.
- In the Properties panel, open Make cut contour, set the offset (0 mm sits exactly on the edge), and choose the type — Die cut, Cut line or Kiss cut (kiss cut is the one for sticker sheets, where the backing stays intact) — then create the contour.
- In a hurry? Object → Make cut contour is a one-click shortcut that adds a 3 mm die-cut with the same result.
This creates a path on a dedicated spot color (for example a swatch named die cut) set to
overprint, so it marks the cut without knocking a hole in your artwork. Spot colors like
this only export as a proper separation from a CMYK document — another reason to set the
color mode early.
Export a print-ready PDF
- Share → Download to open the Export dialog and choose PDF.
- Set the color space to Print (CMYK).
- Turn on Bleed (3 mm) and Crop & registration marks so the printer can align and trim.
- Choose the PDF/X-4 standard and an output profile that matches your print service (for example Coated FOGRA39 or SWOP 2013 Coated #3 — ask them which).
- Keep Outline text on unless your printer specifically wants editable text; outlined text can't reflow or substitute a missing font on their end.
Before it exports, the print checks flag anything risky — images under 300 PPI, spot colors that would be lost, and heavy ink coverage — so you can fix issues here rather than discover them on the proof.
Printing more than one
Ordering a sheet of labels? Use Step & repeat (imposition) in the export flow to tile your label across a production sheet (SRA3, A3, A4 or a custom size), with the gutter and margins your printer asks for. You design one label; the imposition fills the sheet.
That's a label that looks the way you intended and prints the way your printer expects. The same recipe — trim, bleed, safe area, cut line, CMYK, PDF/X — scales up to boxes, pouches and full packaging. When you're ready for the underlying features, the documentation has a page on each one.